Cooking up a story for food.farmer.earth

'On the set' in my own kitchen, making black eyed peas and corn bread for the food.farmer.earth channel at www.cookingupastory.com The cooking demo will air on New Years Day. Look for it and check out all the other videos on the site till then,

Photo courtesy of Rebecca Gerendasy at http://www.cookingupastory.com


‘On the set’ in my own kitchen, making black eyed peas and corn bread for the food.farmer.earth channel at http://www.cookingupastory.com

The cooking demo will air on New Years Day. Look for it and check out all the other videos on the site till then.


Posted in food and cooking talk, southern food | Tagged | Leave a comment

Black Eyed Peas and Corn Bread For Luck and Prosperity in the New Year

Black Eyed Peas and Corn Bread photo courtasey of Rebecca Gerendasy at www.cookingupastory.com

Black Eyed Peas and Corn Bread photo courtesy of Rebecca Gerendasy at http://www.cookingupastory.com

Black Eyed Peas

1 lb. Seasoning Meat (Ham Shanks, Ham Hocks, Bacon, Smoked Turkey Necks etc…..)
2 ea. Onions, Sliced
1/4 cup Garlic Cloves, Smashed and Peeled
1/2 ea. bunch Fresh Thyme, Chopped Fine
3 Tablespoons Seasoning Salt of Choice (Store Bought or Homemade, Recipe Follows)
2 or 3 Bay Leaves
1 or 2 Teaspoons Black Pepper
1/4 to 1/2 Teaspoon Cayenne (Optional)
1/2 Teaspoon Baking Soda (Optional) Note: Baking Soda will Help the Beans Soften Better. Especially if you have Hard Water.
6 Cups Water

Place all Ingredients in large Pot and Bring to Boil. Cook at a High Simmer to Form a Rich Stock. Cooking time will Be about 45 min to and Hour.

1 Pound Dried Black Eyed Peas (Soaking Black Eyed Peas in water prior to cooking will Shorten the Cooking Time But is Optional and Not Necessary)
1 Cup. Celery, Large Dice (more or less)
1 Cup. Carrot, Cut in to Coins (more or less)

Add Ingredients to Stock in Pot and Return to a Boil. Cook till Beans are almost done. This Should take about 1 to 1 1/2 Hours. Check for Seasoning and add More As Needed.

2 Cup. Canned Diced Tomatoes (this is about the amount in a standard can of tomatoes)

Add to pot and Continue Cooking til Beans are Very Tender and The Cooking Liquid Has Formed Rich Sauce Or Gravy.


Old Fashioned Southern Corn Bread

1 or 2 Teaspoons Lard or Oil (Butter is Likely to Burn To Quickly for this Recipe)
1 3/4 Cup. Fine Stone Ground Corn Meal
1 Teaspoon Baking Powder
1/2 Teaspoon Baking Soda
1 Teaspoon Salt
1 Teaspoon Sugar (Optional), Most Southern Corn Breads Don’t Contain Sugar.
1 1/2 Cup. Buttermilk
1 ea. Egg

Put Lard into 9 inch cast iron skillet. Place in oven and Preheat to 500 Degrees.

Combine dry Ingredients in Bowl.

Add wet ingredients to dry and mix well.

When oven is hot. Remove skillet and swish hot grease around in pan to cover all interior surfaces. Pour batter in to skillet and return to oven for about 15 minutes or till golden brown and crusty.

Remove from oven and allow a couple minutes before cutting and serving.

All purpose seasoning

1 Cup. Kosher Salt
1 Cup. Granulated Onion Powder
1/2 Cup. Granulated Garlic Powder
1/2 Cup. Black Pepper
1/4 Cup. Paprika
1/4 Cup. Marjoram
1/4 Cup. Thyme
2 Tablespoons Cumin
2 Tablespoon Sage
1 Tablespoon Ginger
1 Tablespoon Celery seed
2 Teaspoon Ground Rosemary (use a Coffee Grinder to grind up the dried Rosemary)

Place all ingredients in food processor and process til mixture is combines well and smooth.

Store in a tightly sealed container till needed.

This mixture is great with soups, Stews and Roasts.

Posted in southern food | Leave a comment

Irish Cream to chase the clouds away.

One of my favorite things to make and keep in my fridge in winter is homemade Irish cream. Nothing makes that weekend morning cup of coffee brighter during the long gray winters of the pacific northwest. The best part about making your own is you are in full control over what goes in to it and how you want it to taste. It can be fun to make your own labels and give out bottles as gifts. Put your own spin on the recipe. Try adding different extracts for flavor or switch out the Irish whiskey for another liquor. Bourbon for Kentucky cream, rum for Mexican cream or brandy for a Spanish cream. Play with the flavors and come up with new ones.

Home Made Chocolate Irish Cream

A Good Homemade Chocolate Irish Cream Liqueur

  • 1 c. whipping or heavy cream
  • 1 teaspoon vanilla extract
  • 1/2 teaspoon almond extract
  • 1 1/2 c.  Irish Whiskey (or use other liquor of choice)
  • 2 oz. Strong Espresso or very strong black coffee (how strong is up to you)
  • 2 oz good unsweetened dark chocolate
  • 14 oz can sweetened condensed milk

In a saucepan warm the condensed milk. Add the chocolate and stir until fully dissolved. Do not boil. Allow this mixture to cool completely then put everything in a blender and process it for about 15-20 seconds. Drink.

Will keep for 4-6 weeks in a tightly sealed bottle in the fridge,  shake the bottle gently before use.

Posted in beverages | Leave a comment

A long winters Nog… Eggnog that is

Every year for some time now, I make my favorite eggnog the week of Thanksgiving. I mix and taste and taste again and again….. and well you get the idea. Real eggnog is a far cry from the stuff passed off under the same name at the supermarket. It is smooth, and creamy. Not so thick and cloying as the stuff from the store. The flavor is fine and tastes of sweetened fresh egg, spices and booze. Yep, booze…. Bourbon, rum and brandy to be exact. The combination of the three make the best eggnog to my taste. But even though the eggnog is made in November. It is started at least a month or two earlier by making the bourbon spike(If you can manage to remember to do this in the summer even better). The spike is the is the spice part of the egg nog. Take one bottle of good bourbon crack it open . Add Two split vanilla bean, one nutmeg that you smashed in side a towel with a rolling-pin and a three broken cinnamon sticks. Reseal the bottle and put it away for the holiday season. From time to time take it off the shelf and smell it. You will notice that it will start to smell like eggnog.

The recipe that I use came from no one place. It has been pieced together for bits and pieces of recipes for eggnog over time. Over the years it has been tweaked and refined to make it what it is today. The idea of the bourbon spike came from a chef instructor of mine many years ago in Kentucky.  The combining of more then on liquor from old recipes in a few of my southern cookbooks, the amount of sugar is personal taste. The aging of the eggnog comes from personal experience. It is always best after it has had a week to age.

This recipe will have a volume of about gallons at first but will slowly deflate to about a gallon after a few days.

My Southern Eggnog

12 ea. eggs, separated. (Get the freshest highest quality eggs you can find)

3 cups. sugar

1 fithe.  good bourbon spike(see the description above)

1 pint. golden rum (Spiced rum is also very good here)

6 oz. brandy

1 qt. 1/2 & 1/2

1 qt. whipping cream

pinch of salt

  1. Beat egg yolks til light and creamy. Slowly and in sugar and continue creaming til very light. Scrape down the sides form time to time.
  2. Slowly ad in the bourbon spike, the rum and the brandy. Don’t add it to fast or you may break the emulsion and have a big mess on your hands.
  3. Now add the 1/2 & 1/2 and mix well.
  4. Remove from mixing bowl and whip the cream till sort peaks. Add the eggnog mixture into the whipped cream and combine well.
  5. In separate bowl whip the egg whites til soft peaks and incorporate them into the eggnog along with a pinch of salt.
  6. Put in tightly sealed container(s) and store in the coldest part of the fridge til served. p.s… Don’t for get to taste it,
Posted in beverages, southern food | Leave a comment

My Christmas Cast Iron

image

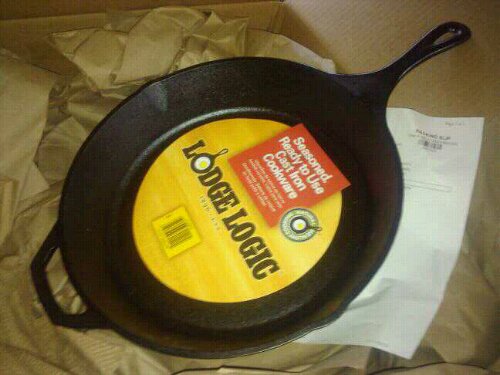
Boom….. that was the noise it made when it hit the porch. I jumped out of bed and opened my door already knowing what it was, just by the sound of the thud.. It was my christmas cast iron. A 13 1/2 in iron skillet that I got with an amazon gift card from my mom. I already own several cast iron pans but most of them are to small. The small ones are easy to find. The bigger ones not so much. I just kept putting off getting a new one hoping to find an old treasure hidden away somewhere. With cast iron older is better. But I could wait no more….. This one is bigger. This one is heavier. This one will be more useful then my others. This one is just waiting to be broke in. Well time to get cooking.

Posted in food and cooking talk | Tagged , , | Leave a comment

Summer Days Pink Lemonade.

This is my favorite lemonade recipe. It is Strong and sweet. Perfect for those really hot days of summer when the sun quickly melts the ice away. You can easily adjust the strength though by using less lemons or sugar to your liking. Grenadine is used to make it pink and to add a subtle fruitiness. People always ask “how do you make it pink”. But few can ever guess.

12 ea. lemons, tips removed, cut in half lengthwise and sliced thin.

2 3/4 c. sugar

3 pt. cold water

2 T. grenadine syrup

1) place lemons into deep container and cover with sugar. muddle and mash them together till juice is extracted. let sit 20 min.

2) add water and stir well.

3) pass mixture through strainer into a large pitcher, gently squeezing out the lemons.

4) add grenadine and chill til service.

This recipe will make about 2qts. of lemonade. be sure to serve over plenty of ice as it is a rather strong brew….. enjoy

Posted in 1 | Tagged , , | 4 Comments

The Art of Homemade Sodas

I remember years ago, as a kid reading about how to make your own root beer and ginger ale. (Yes that was me, I was reading about these types of things while other kids where reading comics.) In one book, though I really don’t remember anything else about the book. The author talked of how their grandmother would make root beer and store it in the basement. Refrigeration was still less common in those days and that was the coolest place to store it. Every once in a while on a hot summer day there would be an explosion of root beer in the basement. If it was not kept cool enough the yeast would begin to ferment again and the bottle lids would fly. The excitement of that thought has stayed in the back of  my mind since then . Only to resurface years later when Miguel told me, after sipping on his root beer. That he would like to try to make his own and use the Mexican sugar that he likes so much. It was then at that moment it all came back to me. I want to make my own root beer and ginger ale.

So the search began and this is what I came up with on-line. I will post pics and tips after I make this myself. Try making it yourself and let me know of the results.

How to Make Ginger Ale

from wikiHow – The How to Manual That You Can Edit

Even though you can look at the shelves in any supermarket and find various brands of ginger ale, making your own is not only educational, but creates an entirely different taste of a refreshing and healthful drink. Here’s how to make a 2L bottle of fresh ginger ale straight from the ginger.

Steps

  1. Add 1 cup of sugar to the bottle through the dry funnel. Leave the funnel in place until all the steps are complete and you are ready to cap the bottle.
  2. Measure out 1/4 teaspoon of fresh granular active baker’s yeast. Use Fleischmann’s or any brand that you might buy in the health food store.
  3. Add the yeast through the funnel into the bottle. Shake it to disperse the yeast grains into the sugar granules.
  4. Grate the ginger root on a fine “cutting” grater to produce 1 1/2 Tablespoon of grated root. See the Tips below for more information on using the right grater.
  5. Place the grated ginger in the cup measure.
  6. Juice a whole lemon. Lemon is important to keep the PH level low and ward off unwanted microorganisms. If you don’t like lemon, try grapefruit juice.
  7. Add the juice of a whole lemon to the grated ginger.
  8. Stir the lemon juice and grated ginger to form a slurry.
  9. Add the slurry of lemon juice and grated ginger to the bottle. (It may stick in the funnel. Don’t worry, the next step will wash it into the bottle.)
  10. Rinse the containers that held the lemon juice and grated ginger with fresh clean water. Do not dump the water just yet.
  11. Add the rinsing water to the bottle.
  12. Cap and shake the bottle.
  13. Reopen and fill the bottle to the neck with fresh, cool, clean water, leaving about an inch of head space, then securely screw the cap down to seal. Invert the bottle repeatedly to thoroughly dissolve sugar. Also check the bottom of the bottle because the suger tends to stick in little pockets there. (The ginger root will not dissolve, of course.)
  14. Place the ginger ale in a warm location for 24 to 48 hours. See the Warnings below.
  15. Test to see if carbonation is complete by squeezing the bottle forcefully with your thumb. If it dents in as in the picture, it is not ready.
  16. Once the bottle feels hard to a forceful squeeze, usually only 24-48 hours, place in the refrigerator. Before opening, refrigerate at least overnight to thoroughly chill. Crack the lid off the thoroughly chilled ginger ale just a little to release the pressure slowly. You do not want a ginger ale fountain!

Tips

  • Make sure the fermenting vessels are cleaned before use, there are a wide variety of powdered sanitisers that can be used.
  • Filter the ginger ale through a strainer if you find floating pieces of ginger objectionable. These are found in the first glass or two poured and, since most of the ginger sinks to the bottom, the last glass or so may require filtering too. Rinse the bottle out immediately after serving the last of the batch.
  • Fermentation has been used by mankind for thousands of years for raising bread, fermenting wine and brewing beer. Carbon dioxide causes bread to rise and gives effervescent drinks their bubbles. This action of yeast on sugar is used to ‘carbonate’ beverages, as in the addition of bubbles to champagne.
  • You may, of course, adjust the quantities of sugar and/or extract to taste. Note that the lemon called for in step seven is optional. And if you want a spicier drink, you can increase the amount of grated ginger.
  • To personalize your ginger ale, design your own label and attach it to the bottle as you place it with pride in the center of your dinner table.
  • You can substitute artificial sweeteners for the sugar as long as you use 2-3 tablespoons of sugar. This is all that is actually required for the yeast to carbonate the beverage.
  • For an interesting variation, simmer a piece of well bruised root ginger in water for an hour as an alternative method of extracting the flavor, this will give the water a golden/brownish tint. Start with about 20g of ginger root per 2 litres of water, and increase/decrease to taste.

Warnings

  • This recipe will produce alcohol in the finished product
    • The quantity of alcohol in the finished product over a 2-3 day fermentation period is going to be minuscule, however, if left out for several days (see further warnings) it will continue to ferment until all of the sugar and the alcohol content will be considerably higher. It will taste nothing like ginger ale. Note also that local laws pertaining to the production and consumption of alcoholic beverages may apply. (For example, some “dry” areas maintain zero tolerance for alcohol in beverages.)
  • Do not leave the finished ginger ale in a warm place any longer than the time it takes for the bottle to feel hard. Leaving it at room temperature longer than two days, especially in the summer when the temperature is high, can generate enough pressure to explode the bottle! Once it is thoroughly chilled, there is little danger of explosion.
  • When purchasing your yeast, do not buy “brewer’s yeast”, as this is typically inactive yeast left over from the brewing process. It is dead yeast, and will not work. For best results, buy yeast from a beer and wine maker’s supply store.

Things You’ll Need

  • clean 2 liter plastic soft drink bottle with cap
  • funnel
  • grater (preferably with fine “cutting” teeth)
  • 1 cup measuring cup
  • 1/4 tsp and 1 Tbl measuring spoons
  • cane (table) sugar [sucrose] (1 cup)
  • freshly grated ginger root (1 1/2-2 tablespoons)
  • use only fresh ginger root (purchasable at most large supermarkets, or Asian food shops)
  • juice of one lemon
  • fresh granular baker’s yeast (1/4 teaspoon)
  • cold fresh pure water

Related wikiHows

Sources and Citations

Article provided by wikiHow, a wiki how-to manual. Please edit this article and find author credits at the original wikiHow article on How to Make Ginger Ale. All content on wikiHow can be shared under a Creative Commons license.


How to Make Root Beer

from wikiHow – The How to Manual That You Can Edit

Making root beer at home is easy, once you gather all the necessary supplies. It’s a great family project and a way to teach the younger ones that not everything tasty comes from an aluminum can. And it’s delicious, too!

Ingredients

  • Glucose(table) sugar [sucrose] (1 cup)
  • Root Beer Extract (1 tablespoon)
  • Powdered baker’s yeast (1/4 teaspoon) or stop by your local home brew shop and get a packet of Lalvin Champagne Yeast #EC-1118. Its about 99 cents for 5 grams and leaves less of a yeast flavor.
  • Cold fresh water

Steps

  1. Using a clean bottle and a dry funnel, add the ingredients in sequence as stated in the steps that follow. First add a level cup of table sugar, (or cane sugar). Adjust the amount to achieve the desired sweetness.
  2. Measure out 1/4 teaspoon powdered baker’s yeast or 1/8 teaspoon if using the EC-1118, and place in the funnel. The yeast should be fresh and active, and any brand that is available will work.
  3. Shake well to make sure that the yeast grains are distributed evenly into the sugar.
  4. Swirl the sugar/yeast mixture in the bottom in order to make it concave and enable it to catch the extract in the middle.
  5. Replace the funnel, and add 1 Tbsp of root beer extract on top of the dry sugar. Notice how the extract sticks to the sugar. This will help dissolve the extract as seen in the next few steps .
  6. Fill the bottle halfway with fresh cool tap water that has only a little chlorine. Pour through the funnel and use this opportunity to rinse extract stuck to the funnel and tablespoon. Swirl to dissolve the ingredients.
  7. Fill the bottle to the neck, this time with fresh water, leaving only about an inch (2.54cm) of head space. Securely screw the cap so as to seal the bottle. Invert repeatedly to thoroughly dissolve the contents.
  8. Place the sealed bottle at room temperature for about three or four days until the bottle feels hard to a forceful squeeze. Then move it to a cool place (below 65 F (18 C)). Refrigerate overnight to thoroughly chill before serving. Crack the lid of the bottle just a little to release the pressure slowly.

Tips

  • There will be a sediment of yeast at the bottom of the bottle, so that the last bit of root beer will be turbid. Decant carefully if you wish to avoid this sediment.
  • Fermentation has been used by mankind for thousands of years for raising bread, fermenting wine and brewing beer. The products of the fermentation of sugar by baker’s yeast Saccharomyces cerevisiae (a fungus) are ethyl alcohol and carbon dioxide. Carbon dioxide causes bread to rise and gives effervescent drinks their bubbles. This action of yeast on sugar is used to ‘carbonate’ beverages, as in the addition of bubbles to champagne.
  • Artificial sweetener cannot be used to replace the sugar. Sugar is required for yeast to generate carbon dioxide which carbonates the beverage. No sugar, no carbonation. You might experiment with less sugar, and add a substitute to make up for the lower sweetness. You can add 1/4 oz by weight of corn sugar (dextrose) or cane sugar to carbonate the soda and sweeten with a substitute. In beer making we use 1 oz by weight per gallon (3.8 liters) to carbonate the bottles so 1/4 oz by weight will work great.
  • Use bottled water instead of tap.
  • Add 0.5 ounces of maltodextrin to 2 liters (8 ounces per 4 gallons) in order to improve body and texture of the finished root beer. Maltodextrin does not ferment and does not replace normal sugar levels.

Warnings

  • Do not leave the finished root beer in a warm place once the bottle feels hard. After a couple weeks or so at room temperature, especially in the summer when the temperature is high, enough pressure may build up to explode the bottle! There is no danger of this if the finished root beer is refrigerated. Move to a refrigerator overnight before opening.
  • There might be alcohol in this home made soft drink. The alcoholic content which results from the fermentation of this root beer has been found, through testing, to be between 0.35 and 0.5 %. Comparing this to the 6% in many beers, it would require a person to drink about a gallon and a half (5.7 L) of this root beer to be equivalent to one 12 ounce (355 mL) beer. It can be said that this amount of alcohol is negligible, but for persons with metabolic problems who cannot metabolize alcohol properly, or religious prohibition against any alcohol, consumption should be limited or avoided. However, there are many high school biology labs who have made this beverage without any problems.

Things You’ll Need

  • clean 2 liter plastic soft drink bottle with cap
  • funnel
  • 1 cup measuring cup
  • 1/4 tsp measuring spoon
  • 1 Tbl measuring spoon

Related wikiHows

Sources and Citations

Article provided by wikiHow, a wiki how-to manual. Please edit this article and find author credits at the original wikiHow article on How to Make Root Beer. All content on wikiHow can be shared under a Creative Commons license.

Posted in 1 | Tagged , , , , , | 1 Comment

Ramen, Rediscovered and Redevised.

Beef Raman in hot and Sour Broth

Beef Ramen in hot and Sour Broth

Shrimp Raman in a Spicy Chile Bean Paste Broth

Shrimp Ramen in a Spicy Chile Bean Paste Broth

Posted in chinese food, on a buget | Tagged , , | 1 Comment

A Fish Called Smelt

I just had Smelt for the first time the other day. They where quite good. I had seen them befor but had no idea what to do with them. They where not some thing that i had growing up.  So when Miguel and I where walking through the store looking for ideas of what to make for dinner we stopped at the seafood counter. I was thinking of making fish and chips, but my plans where soon changed. A big pan of smelt set right in the middle of the ice.  Seeing this, Miguel started telling me how much he liked them and that his mom used to always make them. He then suggested that we have them for dinner. While curious about them I had no idea of what to do with them. So Miguel, without missing a beat called his mom and set up a smelt cooking lesson. We where set for a treat.

Roberta’s Fried Cornmeal Crusted Smelt

120px-smelt


First she took the smelt and cleaned them. She removed the head, the fins and cut it open and removed the guts. She ran the blade of a knife down each side of the fish to remove scales. Many of the fish contained eggs which she saved to ad the pan. The smelt where then rinsed under running water and dipped into coarse ground corn meal.

winter-08-2-010winter-08-2-006

A cast iron skillet was heated over medium heat and a knob of butter was added. The smelt where then fried till golden brown and crispy on both sides. Salt and pepper was added for seasoning.  The roe was also cooked right in the skillet with the fish til it was set and browned on the outside. The little fish where delicious. They where eaten bones and all.

winter-08-2-012winter-08-2-015


Posted in fish and seafood | Tagged , , , , | Leave a comment

Grandma K’s Six Egg Cake

This cake brings back memories of my childhood. Often on the weekends we would travel from the farm up to Louisville to visit my grandparents. Grandma  was a very good baker. We knew that a trip to grandma’s meant that there would be a nice pie or cake waiting for us. Grandma was known for here apple pie and apple dumplings. Both made from the Apples of the tree in here back yard. She was also quite fond of making this very simple yet delicious cake. There where many times that we would show up at her house to the smell of this beautiful, tall, golden, crusty, cake covered with nothing more then a ample dusting of powdered sugar. p.s.  This cake is wicked good with fresh sweetened strawberries and a scoop of ice cream on top.

Six Egg Cake

2 c. White sugar

1 c. Shortening

1 tsp. Vanilla

  • Cream together well.

6 ea. Eggs

  • Beat eggs into creamed mixture thoroughly, one at a time til all are added.

2 c. Sifted, Flour

1/4 tsp. salt

  • Combine and beat into creamed mixture.
  • Pour into a tube pan or a bunt pan. Run a knife around the center of the batter to get out excess air bubbles.
  • Bake at 350 for about 50 to 60 min. Til golden and crusty.
Posted in my family's favorite recipes | Tagged , | Leave a comment